Tuesday, 19 June 2018

How to Translate Webpages in Safari for iPhone and iPad


How to Translate Webpages in Safari for iPhone and iPad


How to Translate Webpages in Safari for iPhone and iPad


Though both the apps are up to the mark, we have found Microsoft Translator pretty easy-to-use and right on the money. It supports text translation in as many as 60 languages. The other notable features of this app include voice translation, multi-person conversation, phrasebook for verified translations, etc. Thoroughly impressed by its neat functionality, we’re going to use it in this tutorial.
Add Microsoft Translator Browser Extension to Safari on iOS Device


To get started, you need to first add Translator browser extension to Safari.


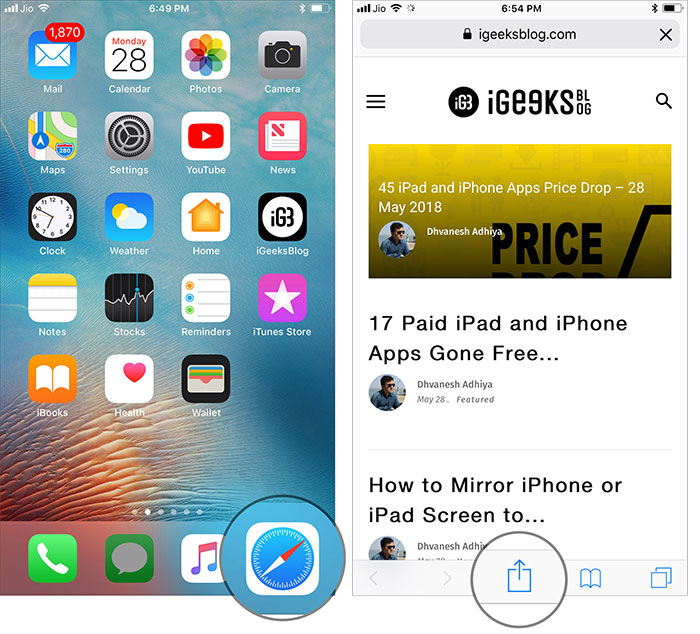
Step #1. First off, download Microsoft Translator on your iOS device. Then, open Safariand tap on the share button.


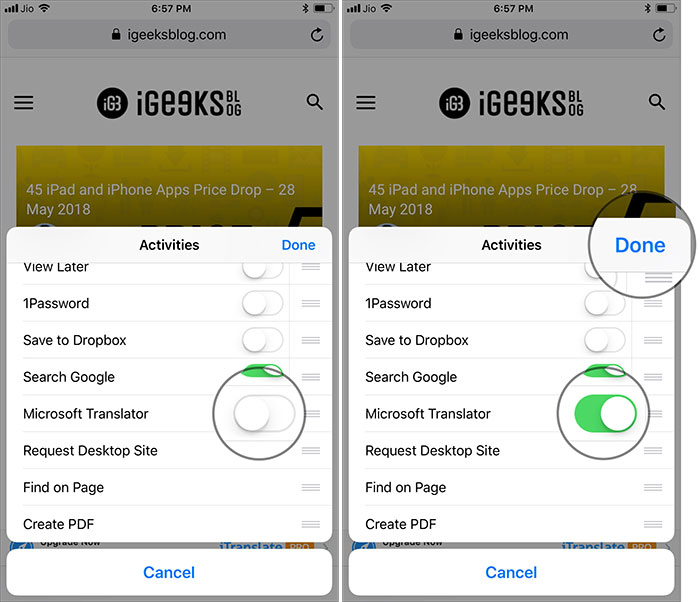
Step #2. Now, swipe left in the Activities row and tap on More button.


Step #3. Next, toggle on the switch next to your Microsoft translator app. Then, make sure to tap on Done button to confirm the change.


Sponsored Links


If you want to often use the app, simply drag it at the top so that you can quickly access it in the activities row.


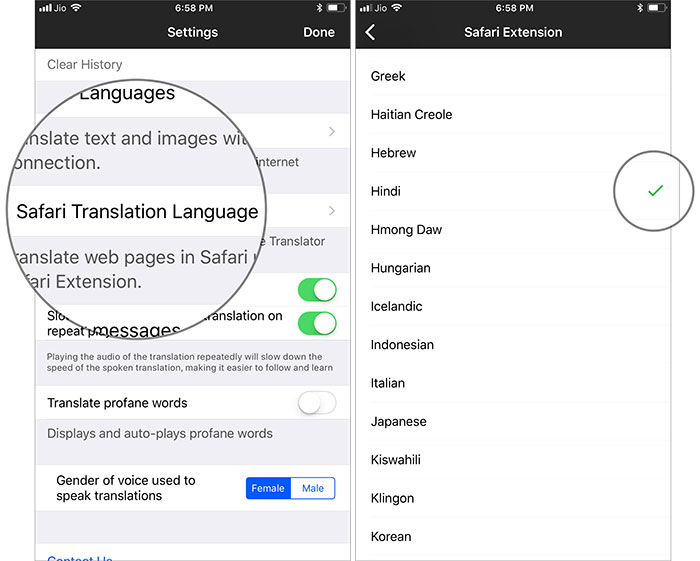
All set? You may want to choose your preferred language. To do so, simply open Microsoft Translator app and tap on Settings icon at the bottom right corner.


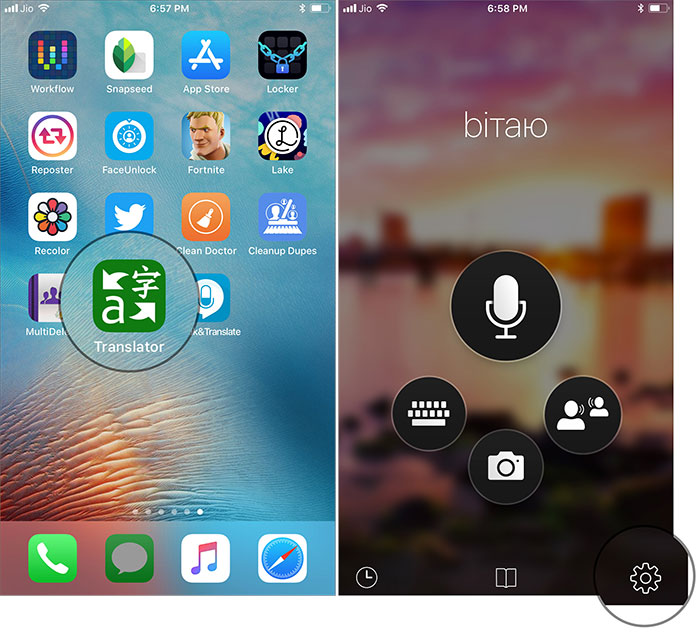
Then, tap on Safari Language Translation and select the desired language.


Translate Webpages in Safari


Step #1. Launch Safari on your iOS device.


Step #2. Now, head over to the site which article you want to translate.


Step #3. Next, tap on the share icon at the bottom.


Gihosoft iPhone Data Recovery is a professional iPhone Data Recovery software to get back all your lost text message, photo, video, call history, note, contact and more from iPhone/iPad/iPod Touch. It offers a full solution to recover your lost data in different tough situations. Besides recovering data directly from iPhone, iPad and iPod touch, it also allows you to recover data from iCloud and iTunes backup files.


Step #4. Next up, select Microsoft Translator.


Voila! Check out now, the webpage has been translated into your preferred language. You can repeat the same steps to translate other webpages.


Over to you:


From now onwards, use this highly user-friendly app to prevent the foreign language from becoming a barrier. And yes, if you come to know any other translators that work perfectly with Safari, do let us know about them as well.


I Bought More iCloud Storage But It’s Not Showing Up?

4 Tips to Fix iCloud Storage Not Showing Up Problem

  • Tip 1. Check with Apple
  • Tip 2. Sign Out of iCloud and Sign Back In
  • Tip 3. Hard Reboot iPhone
  • Tip 4. Reset Network Settings

1. Check with Apple

The first tip we would like to suggest you to do is checking with your Apple support team to know if there is any problem about iCloud server. In case there's a problem with the server, iCloud storage might not show up on purchasing. You can also check Apple System Status. This website shows which server or system is in maintenance.
apple system status

2. Sign Out of iCloud and Sign Back In

If still iCloud storage isn't showing up after you purchase more storage, sign out of your iCloud and then sign back in again. We hope this will work. The steps are:
  • Open 'settings' and tap on Apple ID located at the top.
  • Now, scroll down to 'Sign Out' and tap on it.
  • Enter the Apple ID password after that. Hit on 'Turn Off' now and start sliding the toggle the buttons beside the data types that you want to keep in your iPhone.
  • Lastly hit on 'Sign out' and confirm it.
sign out iCloud
Now you can sign in again and see if the storage is showing up now or not. If not, follow the next tip.

3. Hard Reboot iPhone

It is the most common workaround and one can rely on it since it has helped many users who've done purchasing more iCloud storage but it's not showing up. The steps slightly differ with various models. We will show you the steps for each iPhone model.
For iPhone 6 and previous models: Start pressing 'Power' and 'Home' buttons simultaneously. Keep doing until you get to see Apple logo on the screen.
hard reboot iPhone 6
For iPhone 7/7 Plus: Hold down 'Power' and 'Volume Down' buttons at the same time. Release them when you see Apple logo.
hard reboot iPhone 7
For iPhone 8/8 Plus/X: Press 'Volume Up' and release immediately. Press 'Volume Down' and release immediately. Now, long press 'Power' button until you get Apple logo on your screen.
force restart iPhone X

4. Reset Network Settings

When you've bought more iCloud storage but it's not showing up, there might be some issue with your network settings. Thus, we advise you to reset those settings once. This method will clear all your network settings so please ensure to take backup of them before proceeding.
  • Go to 'Settings' and tap on 'General'.
  • Scroll down to 'Reset' option and go to 'Reset Network Settings'.
  • Start entering your passcode and confirm the action by again tapping on 'Reset Network Settings'.
  • Gihosoft iPhone Data Recovery is a professional iPhone Data Recovery software to get back all your lost text message, photo, video, call history, note, contact and more from iPhone/iPad/iPod Touch. It offers a full solution to recover your lost data in different tough situations. Besides recovering data directly from iPhone, iPad and iPod touch, it also allows you to recover data from iCloud and iTunes backup files.

reset network settings

Which apps are compatible with iOS 12?


IOS 12 APP COMPATIBILITY EXPLAINED


Whenever Apple seeds a new beta update, a lot of apps break or simply become unstable.


Thankfully, almost all apps are supported this time around as iOS 12 Beta 1 is not a major upgrade over its predecessor.


The list given below is maintained by the community, so results might vary depending on the device used.


What works on your iPhone may not work on your iPad. If you come across an app that is not posted below, add it in the comments section below.


If apps that you use on a daily basis are already compatible, you should probably upgrade. If not, stick to the latest public version, that is, iOS 11.4 or below.


Once Apple seeds the public update in September, you can then freely update your Apple device.
COMPATIBLE APPS


ANZ Banking Australia


The CW


VPNHUB


1 Second Day


17Track


1Password


9GAG

AccuWeather


ACTIC


AdGuard


Adventure Communist


Aftenposten


Ally Mobile


Altibox TV Overalt


Amazon


Amazon Alexa


Amazon Prime Video


Anchor


Anylist


Arlo


Atlas


Audible


August (Smart Lock)


Authy


AZ Rockets


Banco de Chile (Mi Pass)


Bank of Scotland


Barclays UK Banking


BBC News


Bejeweled Classic


Big Day


Bird


Bitmoji


Bitworth


Blink


Blizzard Authenticator


Blockfolio


BMX 2


Bookly


Brain.fm


Burst Reddit client


Camera+


Carrot Weather


Chase


Chipotle


Clash of clans


CNN


Coinbase


Color Tube


ContinueOnPC


Cortana


Dagbladet


Day one


DEVONthink To Go


DirecTV Now


Discord


DJI Go 4


DNT SjekkUT


Documents by Readdle


Draw In


Draw Something Classic


Dropbox


Dune


Duolingo


eBay


Ecobee


Edison Mail


Enlight


Episoder


Etoro


Eurovision


Facebook


Facebook messenger


FaceTune


Fandango


Fastmail


Firefox


FitNotes


Flightradar24


Flipboard


Flying Arrow


Focalmark


Focus Keeper


Fox News


FoxSports Go


Fruit Ninja


GlassDoor


Gmail


Google


Google Assistant


Google Calendar


Google Docs


Google Drive


Google Hangouts


Google Home


Google Maps (CarPlay support is not currently available)


Google Photos


Google Play Music


Google Translate


Google Voice


HBO


Heads Up!


Hearing Test


Helix Jump


Hill Dash 2


Hjelp 113


Homebridge


HotspotVPN


HQ Trivia


Hue (Philips)


iFruit


IFTTT


iHeartRadio


IMDb


Imgur


Inbox


InkHunter


Instagram


Instapaper


Itslearning


Jump! Remote Desktop


Kahoot!


Knife Hit


Kolumbus Billett (Norwegian)


Kolumbus Reise (Norwegian)


Lappen


LastPass


LastPass Authenticator


Layout


Letterboxd


Life Cycle


Linkedin


Lively


Love Balls


Lyft


Mein Schiff 4 Bordfinder


Mein Schiff 5 Bordfinder


Mein Schiff 6 Bordfinder


Mobile Pass


MobilePASS+


MoneyWiz 2


MS Outlook


My Disney Experience


MySolarCity


NAB Banking App (Australia)


Narwhal for Reddit


Nationwide UK Banking


Natwest Mobile Banking


Nest


Netflix


Newsify


Night Sky


Nike Training


Nike+ Runclub


Norstat


Norwegian Altinn


Norwegian Bibliofil


Norwegian Digipost


Norwegian FINN.no


Norwegian Sparebank 1 SR-Bank Mobilbank


Norwegian Teoriappen


Norwegian Teoriappen Skilt


Norwegian Vipps


Norwegian YR


NRK


NYTimes


O2 UK


Oanda fxTrade


Outfolded


Outlook


Overcast


Pandora


Paprika 3 (crashes on iPhone 8)


PayPal


Peil (Norwegian)


Periscope


Photomath


Piano Tiles 2


Pinterest


Pixel Plex


Pixelmator


Plex


PNC Bank


Pocket Casts


Poke Genie


Pokémon Go


Postnord


ProCam


Proton Mail


PS App


Quizlet


Quora


Reddit


Reflectly


Rent.com


Revolut


Ring


Rise Up


Robinhood


Russ.no


Samsung Smart Things


Samsung Smart View Remote


Scotiabank


Screens


Simplenote


SketchAR


Skype for Business


Slack


Sleep++


Smart Life


Snapseed


Sniper 3D


Sonos


Spark


Spark by Readle


Speedtest.net


Spotify


Statens Vegvesen Bil og henger


Steam


StepsApp


Strava


Street View


Stringify


Swarm


Telegram


Telegram


Telia


Telia Soundmaker


Tesla


The Guardian


The Sandbox


The Weather


Thuuz Sports


Toggl


TradingView


Transmit


Truecaller


Tunnelbear


Tweetbot


Twitch


Twitch


Twitter


UNICORN


UT.no


Vellum


Venmo


VG


VMWare Airwatch (Exchange ActiveSync)


Walkr


Warframe


Waze


Weather Channel


Wells Fargo


Wemo


WhatsApp


WhatsApp


WiFi Photo


Wish


Workflow


Xbox


Xfinity Stream


Yelp


YouTube


YouTube


Zenly
INCOMPATIBLE APPS


Alien Blue


Amazon AWS Console


HSBC UK (crashes on launch)


Notability (not working only on iPad Pro)


OpenVPN (connection doesn’t work, connect from Settings > VPN to ensure connection doesn’t drop)


Pandora


Skype


Snapchat


Untappd (infinite page load)
UNSTABLE/BUGGY APPS


Apollo (not working on iPad 5 and media has a dark overlay)


Bank of America (app opens and lets you enter the security code but the app freezes afterward)


Battery Life (doesn’t display any data)


Fire Chat (layout not updated for iPhone X resolution)


Fire Up! (slight laggy startup on iPhone 7)


Fitbit (change watch not possible)


Fortnite (doesn’t launch every time)


Lirium Info Lite (battery health statistics do not show anything)


MS Outlook (buggy user interface)


Microsoft Office (Word, Excel, Powerpoint, etc.) (Office Lens opens up to splash screen, refuses to load and crashes on iPhone 6 and iPhone 8)


MyAniList (only works on TestFlight beta version)


Nexx Garage (layout not updated for iPhone X resolutions)


Notability (working with version 8.0.3 after deleting and reinstalling)


SPILLZ (slow startup)


Strava (doesn’t record activities)


The Cube (slow startup)


Tumblr (broken GIF images)


Check out our Twitter and Facebook pages for more iOS updates.
If you lost videos from iOS Camerall Roll which are nowhere to download again, you can use Gihosoft iPhone Data Recovery to get back deleted videos from iOS device including iPhone, iPad and iPod Touch.

You may also like:

How to transfer messages from iPhone to iPhone
Gihosoft iPhone Data Recovery is a professional iPhone Data Recovery software to get back all your lost text message, photo, video, call history, note, contact and more from iPhone/iPad/iPod Touch. It offers a full solution to recover your lost data in different tough situations. Besides recovering data directly from iPhone, iPad and iPod touch, it also allows you to recover data from iCloud and iTunes backup files.


Saturday, 16 June 2018

How to remove default Macintosh HD icon from the desktop on Mac

Here’s how to remove or hide the Macintosh HD icon from the desktop on your Mac running macOS High Sierra 10.13, macOS Sierra 10.12 or below.

When setting up your Mac or seeing around the desktop, you might have notice some folders, files and Macintosh HD icon. But except Mac’s default Macintosh HD icon, all the desktop items can be easily removed or deleted.

Removing the Macintosh HD icon from the desktop is not a big deal as I have a step by step guide for you to delete desktop’s Macintosh HD icon from mac.

How to Delete Macintosh HD icon from the desktop on Mac

It’s really simple to hide or delete Macintosh HD icon from your Mac desktop.

Step 1: From the top left corner Menu Bar, go to Finder
Step 2: Click on Preferences or hit the shortcut key (⌘ ,) from your Keyboard
Step 3: In the General tab, Under the list of labels uncheck the Hard disks box to hide Macintosh from the desktop on Mac.
Gihosoft iPhone Data Recovery is a professional iPhone Data Recovery software to get back all your lost text message, photo, video, call history, note, contact and more from iPhone/iPad/iPod Touch. It offers a full solution to recover your lost data in different tough situations. Besides recovering data directly from iPhone, iPad and iPod touch, it also allows you to recover data from iCloud and iTunes backup files.

Also See:


Unable to share passwords with AirDrop in iOS 12 and macOS Mojave? Tips to solve the problem


Tips to solve the problem Unable to share passwords with AirDrop in iOS 12


Unable to share passwords with AirDrop in iOS 12 and macOS Mojave? Tips to solve the problem


Unable to share passwords with AirDrop in iOS 12 and macOS Mojave? Tips to solve the problem
Make sure AirDrop is turned on


The first thing to do is to make sure that AirDrop is enabled on your devices. In addition, make sure you have selected Everyone to be detectable by all compatible devices nearby


On your iPhone and iPad


Step # 1. Open Settings app ⟶ Tap General.


Step # 2. Now tap AirDrop . Then, make sure that Everyone is selected


Alternatively, you can view the Control Center ⟶ touch and hold the Wi-Fi icon ⟶ AirDrop icon ⟶ and choose Everyone.


On Your Mac


Step # 1. Open Finder on your Mac.


Step # 2. Now click on Go to menu then click on AirDrop .


Step # 3. Then click on the drop down menu next to "Let me to be discovered by " then select Everybody


Be Sure …Gihosoft iPhone Data Recovery is a professional iPhone Data Recovery software to get back all your lost text message, photo, video, call history, note, contact and more from iPhone/iPad/iPod Touch. It offers a full solution to recover your lost data in different tough situations. Besides recovering data directly from iPhone, iPad and iPod touch, it also allows you to recover data from iCloud and iTunes backup files. Image result for gihosoft iphone


How to Put iPhone into DFU Mode – Quick Tip

How to Put iPhone into DFU Mode – Quick Tip


Before we start:


DFU mode wipes out all the existing data from your device. Therefore, you should always back up your device before moving ahead with the process.


You can’t put your device into DFU mode, if Find My iPhone is enabled. Hence, be sure to turn it off. Open Settings app → Apple ID banner → iCloud → Find My iPhone and turn it off.


Besides, make sure you have the latest version of iTunes installed on the computer.
How to Put iPhone or iPad into DFU Mode


Step #1. To get started, connect the iPhone to your computer and launch iTunes.


Step #2. Now, ensure that your device icon shows up in the top left menu.


Step #4. Now, you turn off your device. Press and hold the sleep/wake button and swipe to power off.


Note: On your iPhone X, iPhone 8/8 Plus, you need to press and hold the side button and volume up/down button and then slide to power off.


Now, enter DFU mode on your device. The process differs based on the device.


On iPhone X, iPhone 8/8 Plus: Press and hold the Side button for 3 seconds and then press and hold the volume down button while still holding down the side button. Make sure to keep holding both buttons for 10 seconds. Next, you need to release the Side Button but continue to hold the volume down button for about 5 seconds. If your iPhone screen remains black, it will have entered DFU mode.


iPhone 7 or 7 Plus: Just press and hold the sleep/wake button for 3 seconds. Then, you need to press and hold the volume down button while still holding the side button. After 10 seconds, you have to release the sleep/wake button make sure to continue to press the volume down button. Next, you have to wait for 5 more seconds and release the volume down button.


iPhone 6s or older: Just press and hold the home button and the sleep/wake button simultaneously. Then, you need to release the ON/OFF button after 10 seconds, however, make sure to keep holding the Home button. Then, you need to wait for about 10 seconds and then let go the Home button.


After you have entered DFU mode, iTunes will confirm that the device is in recovery mode. Click “OK.”


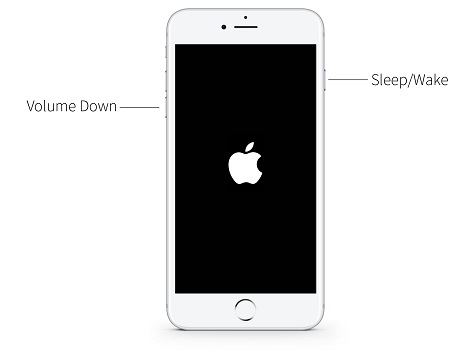
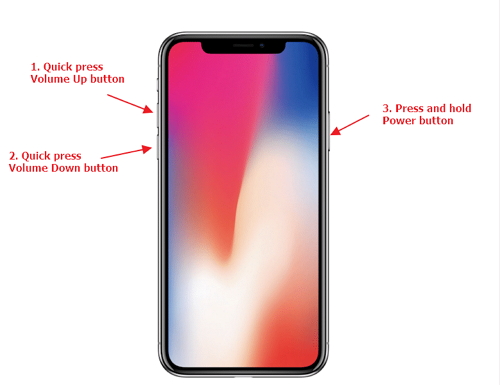
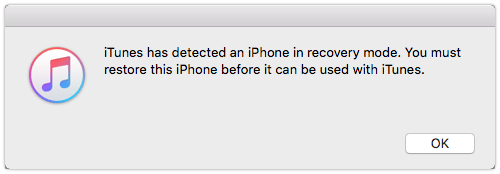
Important: If your iPhone screen remains black, it will have entered DFU mode. But if you see iTunes logo on the screen, it means you have gone wrong. Hence, you will have to repeat the steps all over again.


Then, you can go ahead with the task and downgrade or update the device based on your need.


After your iPhone has been successfully restored, it will get out of DFU mode automatically.


But what if someone has put your iPhone into DFU mode, how can you get your device out of it? It‘s easy to exit this mode. Keep reading…
How to Exit DFU Mode on iPhone X, iPhone 8/8 Plus


To exit DFU mode, all you need to do is restart the device by holding down the power button and volume down button until you see the Apple logo.
How to Exit DFU Mode on iPhone 7/7 Plus


On iPhone 7/7 Plus, you have to press the side button and volume down buttons at once to get out of DFU mode.
How to Get iPhone 6s or Earlier or iPad Out of DFU Mode


On your iPhone 6s or earlier or iPad, you need to press and hold Home and Power buttons for about 10-12 seconds.


Then, release the Home button but quickly press and hold the Power button until the Apple logo comes up on the screen.


Wrapping up


Have any question? Shoot it in the comments below. Once more, don’t fail to give a chance to DFU when everything else doesn’t seem to be fixing any persistent issue on your device.

Gihosoft iPhone Data Recovery is a professional iPhone Data Recovery software to get back all your lost text message, photo, video, call history, note, contact and more from iPhone/iPad/iPod Touch. It offers a full solution to recover your lost data in different tough situations. Besides recovering data directly from iPhone, iPad and iPod touch, it also allows you to recover data from iCloud and iTunes backup files.


Saturday, 9 June 2018

4 Solutions for iPhone Freezing after Screen Replacement


4 Solutions for iPhone Freezing after Screen Replacement


1. Check If There Is Any Other Hardware Problem


2. Force Reboot iPhone


3. Fix iPhone Freezing after Screen Replacement without Data Loss


4. Restore iPhone with iTunes using DFU Mode (Lose All Data))
1. Check If There Is Any Other Hardware Problem


First of all, when you find your iPhone freezing after screen replacement, it is a wise idea to take your device to the Apple Store and get it checked there. Some hardware problem is bothering perhaps. Therefore, it becomes necessary to let your device get inspected by the experts, since some hardware might not be installed well or has been affected during the screen replacement process, which causes the freezing problem. If the experts there say there's no problem with your hardware, then there might be software problem.


2. Force Reboot iPhone


To make your iPhone back to normal when it is freezing after screen replacement, a quick fix that can help you is to force reboot your device. You might have known about how to do this if you are an iOS device user. But if not, we will tell you how you can carry out this method. It is an elementary workaround that has the ability to fix majority of common iPhone issues in a couple of seconds. So, if your iPhone is not responding you back, here is what you should do.


iPhone 8/8 Plus/X users need to: Press the 'Volume Up' button and release it quickly. Subsequently press 'Volume Down' button and release quickly. Now, start pressing the 'Power' button until Apple logo on the screen becomes visible.You may also like:
Jihosoft iPhone Backup Extractor Extract and recover all types of data from iPhone backup files, such as camera roll photos, videos, SMS, contacts, reminders, WhatsApp, and etc.


iPhone 7/7 Plus users need to: Start pressing the 'Power' button and the 'Volume Down' buttons in unison. You need to keep holding the buttons for approximately 10 seconds and release them when you see Apple logo on your screen.Gihosoft iPhone Data Recovery https://goo.gl/LF7B13 Gihosoft iPhone Data Recovery is a professional iPhone Data Recovery software to get back all your lost text message, photo, video, call history, note, contact and more from iPhone/iPad/iPod Touch. It offers a full solution to recover your lost data in different tough situations. Besides recovering data directly from iPhone, iPad and iPod touch, it also allows you to recover data from iCloud and iTunes backup files. https://www.gihosoft.com/iphone-data-recovery-free.html


iPhone 6/6 Plus and earlier models' users need to: Press the 'Power' and the 'Home' buttons at the same time. Don't release the buttons until you catch sight of the Apple logo on your screen.


Now, this should solve your iPhone frozen problem after screen replacement issue but if it is still persisting, you should then proceed to the next solution.
If you lost videos from iOS Camerall Roll which are nowhere to download again, you can use Gihosoft iPhone Data Recovery to get back deleted videos from iOS device including iPhone, iPad and iPod Touch.

How to Fix iPadOS Password Not Recognised Error

Restore iPad using iTunes to Bring Your iPad to Normal (Device Must Be Sync with iTunes Before) Although, the previous procedure is effectiv...