Wednesday, 27 March 2019

How to take a screenshot on Android


A screenshot is a handy tool for proving something, or for quickly capturing a snapshot of something you like on your smartphone screen. In this article, we'll show you how to take and edit screenshots on Android, and we'll also tell you how to record a video of your screen.


How to take a screenshot

On most Android devices, the following key combination takes a screenshot:


Go to the screen you wish to capture.


Press and hold the Power and Volume Down buttons (or Power and Home buttons on a older Samsung or HTC phone).


Hold down both buttons until you hear the click or a flash indicating that the screen has been captured.


Swipe down from the top of the screen.


Tap the new screenshot notification to view the screenshot.

Often, you will then have the option to share or delete the screenshot directly. This may save you time from manually having to search for the screenshot.

Android 9.0 Pie has added a new option: you can also press and hold the Power button to get a Screenshot option to pop up on screen. You can then edit the screenshot from the notification bar and mark it to highlight a particular area.

Some manufacturers offer additional shortcuts, for example:


OnePlus 5, 5T, and 6: Swipe down with three fingers on the home screen.


Sony Xperia phones: Hold down the power key until a screen appears and tap Take a screenshot.

With Samsung, you can edit screenshots right away. / © AndroidPIT

The screenshots can be found in the gallery under Screenshots. When accessed via USB on a computer, they can be found in the internal memory or on the SD card in the directory /Pictures/Screenshots, and in the case of Samsung smartphones, in the directory DCIM/Screenshots.

If your smartphone doesn't provide post-processing options for screenshots, we can recommend the free screenshot app: Screen’it. It provides important filters to make phone numbers, names, or email addresses unrecognizable in screenshots.

Screenit - Screenshot App

Take a screenshot on Samsung phones

Samsung is one of the most popular Android smartphone manufacturers and famous for making their devices work just a little differently. The two button press button works on Samsung phones, but it's a little different if your device is one of the older phones with a physical home button.


Galaxy S8 and later: Press and hold down the Power and Volume Down buttons for a few seconds.


Galaxy S7 and earlier: Press and hold down the Power and Home buttons for a few seconds.
Palm Swipe to Capture on Samsung phone

Most Samsung phones released after 2013 also offer 'Palm Swipe' shortcut to take screenshots. To do this:


Set your hand vertically on one side of the screen, fingers straight like in a karate chop


Horizontally swipe with the bottom edge of your hand across the screen


The camera shutter sound should activate and a screenshot saved to the gallery

Android screen capture is really easy and convenient! However, you may find it’s rather troublesome when your screenshots get lost or deleted by accident. In this case, you may need a professional Android data recovery software like Gihosoft Android Data Recovery. With this freeware, you are able to recover deleted screenshot from Android internal memory or SD card effortlessly!Also Read:Update Android

Also Read:Top 8 Best Alternative Websites to TamilGun in 2019

Also Read:Best Alternative Sites to Solarmovie


Take a screenshot with the S Pen

If you have a Galaxy Note9, Galaxy Note 8, Galaxy Note 5, Galaxy Note 4, Galaxy Note 3, or other Samsung device with an S Pen, you can use it to take a screenshot.


Pull out the S Pen stylus, or hover the pen over the screen and clicking the button on it.


This should open the Air Command menu


Select Screen Write from the Air Command options to take a screenshot.


You can then write notes on top of the image. There are options in the top toolbar to change your pen color and size. You can also erase or undo strokes and there is a Crop option at the bottom.


Tap Share or Save at the bottom when you're done.
Take a screenshot with Google Assistant

You can also ask Google Assistant to take a screenshot for you, provided you have it set up. When you're on the screen you want to capture, just say, "OK Google, take a screenshot," and it should immediately do so, saving a picture of the screen below the Assistant interface.


Google Assistant tips and tricks: beginner to expert


The best Google Assistant commands you have to try

This does mean that if you want to capture the Google Assistant screen itself, you'll have to use the hardware buttons.
Scroll shows: long screenshots

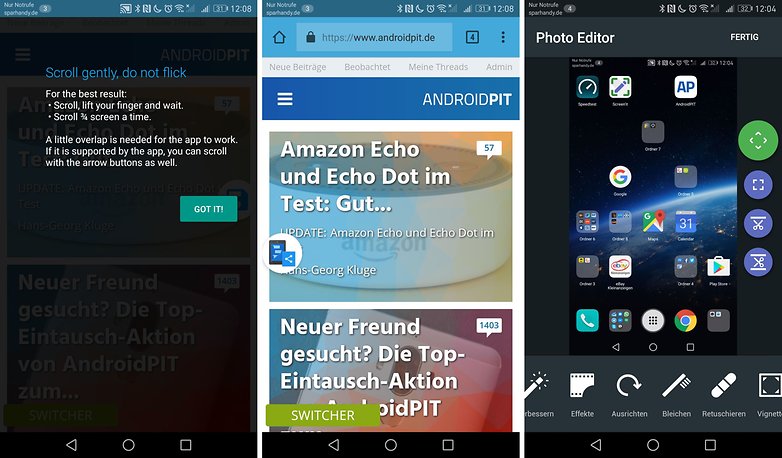
Screenshots aren't just for capturing segments of an image and cropping. There are also several types of screenshots in Android. Some manufacturers offer the scroll shot in addition to the conventional screenshot. This is particularly suitable for making images of longer texts or websites. The way it works is simply ingenious:


How to capture scrolling screenshots on Android

The software takes the first screenshot, rolls down a bit, takes the next one, and so on, and fits the pieces together at the end. We tried it out on the AndroidPIT homepage and uploaded it to Google Photos. Click here to see the example.


8 Best Snapchat Saver Apps to Save Snapchat Photos, Videos, and Stories


Screenshot apps work with provisional buttons. / © AndroidPIT

If your smartphone does not have a scrollshot feature, you can retrofit it with an app like Longshot or Screen Master.

LongShot for long screenshotScreen Master: Screenshot & Photo Markup
Capture on-screen videos

Some Sony smartphones have a screen recording function in the power-off menu. Press and hold the power button to enter the options menu. The MP4 format recordings should be in /Movies/RecordScreen.

Screen recording is easy with a Sony smartphone. / © AndroidPIT

Also, Huawei smartphones can create screen videos with knuckle gestures. In the Huawei Mate 9, for example, tap twice with two knuckles to record video.

For Samsung smartphones like the Samsung Galaxy S6 or newer, this is found through the Game Launcher (which must be installed on the S6). However, this is limited to games or at least individual apps.

Record a live video of your screen and set it to music. / © AndroidPIT

Other smartphones without a built-in recording function can be retrofitted with a screen recorder app. Our preferred tool is AZ Screen Recorder. These recordings are created with sound from your microphone, so you can comment directly on what you are doing. A muffled tapping underlines screen touches. The MP4 files end up in the AZRecorderFree directory and are around 24 MB/minute in size.

AZ Screen Recorder - No Root

It's easy to take whatever kind of screenshot you like

After many revisions in the operating system, the creation of screenshots and scrollshots in Android has become easier over the years. If your smartphone manufacturer doesn't yet have such a tool, it can simply be retrofitted with apps from the Play Store.

Do you know of any other cool ways to take a screenshot? Let us know in the comments below.


Top 10 Best Screen Recording Apps for Android Not to be Missed


Tuesday, 5 March 2019

iPhone 6/7/8/X Ringtone not Working on iOS 12/11? Fix it Here!


When iPhone Ringtone not Working, You Should Check the Mute/Ring Switch First

When you notice your device has stopped ringing out, it is important to check to be sure you didn’t put the mute button on. If an orange/red line shows on the switch, this means your device is on Mute mode. Turn off the Mute switch by pushing the switch towards your screen to switch ON your device ringer.
Restart Your iPhone

Some minor bugs or issues may occur after updating to the iOS 12/11, one of which could be the ringtone not working on iPhone 6(or iPhone 7/8/X). To turn off device, press down the Sleep/Wake button until the device shows “slide to power off,” and reboot the device after few minutes by pressing down the same key.
Reset All Settings

In case you have tried all the aforementioned tips, and you still have issues with your ringtone, then you should reset your entire device Settings. Below are the steps for resetting your device settings:


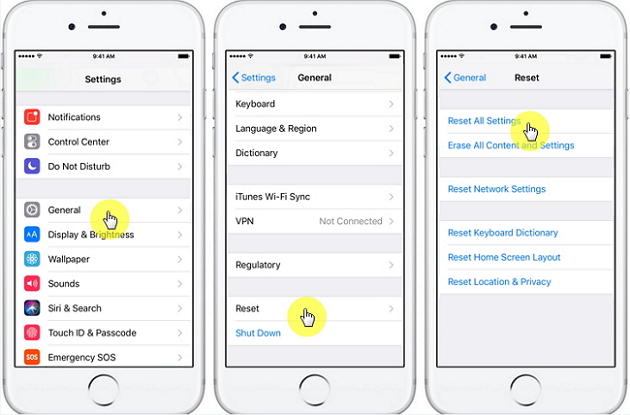
Open your Settings app and select General


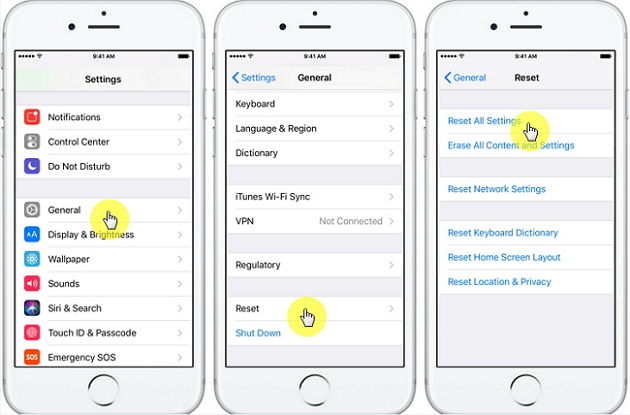
Click on Reset, and then click Reset All Settings


Enter your device password if required, and select Reset All Settings


Your device will restart to its factory settings. This should thereafter solve the ringtone issues.


Hard Reset Your iPhone

Have you tried the above tips, and you still can’t sort out the ringtone issues on your device? Then we will recommend you do a hard reset on your iPhone. Please note that this process totally erases all data and information on your device and restores it to its factory settings. It is therefore important that you back up your device first, so that you don’t lose important data.
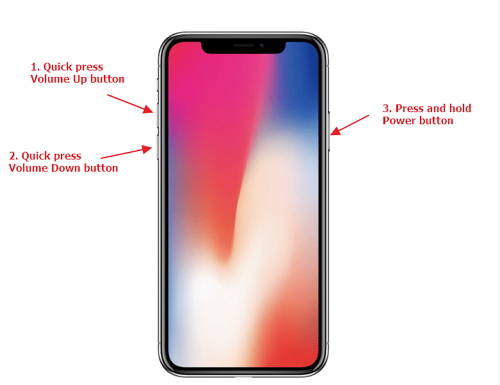
How to Hard Reset iPhone 8, 8Plus & iPhone X


Press and quickly release the Volume Up key


Press and quickly release the Volume Down key


Press Down the Sleep/Wake (power) button until the Apple logo appears on the screen.


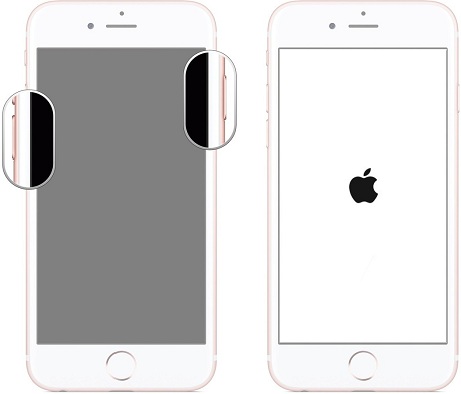
How to Hard Reset iPhone 7, 7Plus


Press and hold down the Sleep/wake and Volume Down buttons together until the Apple logo comes up on the screen. Also Read:Top 6 Best Vumoo Alternative Sites for You to Watch and Download Movies 2019

Also Read:How to Access and Unlock Android Phone with Broken Screen Also Read:jihosoft Free iPhone Data Recovery


Sponsor ads:
Gihosoft Free iPhone Data Recovery:https://www.gihosoft.com/iphone-data-recovery-free.html
Gihosoft iPhone Data Recovery Free
Free iPhone Data Recovery Software for Windows/Mac
Recover up to 12+ types of files, including contacts, SMS, photos, WhatsApp, Viber, notes, etc.
Restore lost data from iOS devices directly or from iTunes and iCloud backup
Recover iPhone data lost due to iOS upgrade/jailbreak, accidental deletion, device lost or broken
Support all the latest iPhone, iPad and iPod Touch
Both Free and Pro version.

If you lost data after you updated to a new iPhone, you can always use Gihosoft iPhone Data Recovery to get the data back from the old iPhone or backup.You may also like: iphonerecovery.com
If you use android phones, please choose Gihosoft Android Data Recovery.
With Gihosoft Android Data Recovery, no longer afraid of data loss!
Must read:Youtube video downloader for pc
Gihosoft RePicvid Free Photo Recovery Software provides a free photo recovery software for windows to help users recover the deleted or lost photo for free.
Jihosoft Android Data Recovery: the best Android Data Recovery software for Windows and Mac to recover deleted contacts, messages, photos, videos, WhatsApp and etc from Android devices.Tips:How to transfer messages from iPhone to iPhone


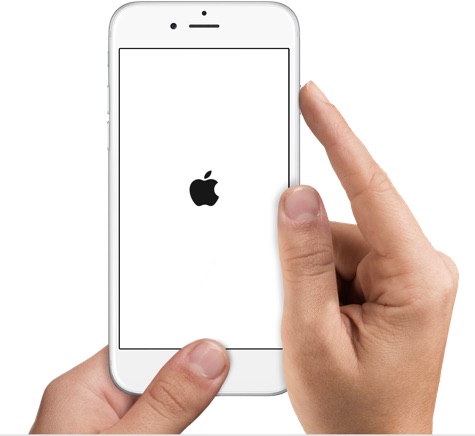
How to Hard Reset iPhone 6s and Earlier Versions


Press down both the Sleep/wake and Home buttons until the Apple logo shows on your iPhone screen.Also Read:How to Download Songs from Spotify with 4 Best Spotify Music Downloaders 2019

Also Read:How to Fix AC3 Audio Format Not Supported Error in MX Player


Bonus: Customize Ringtone from Your Favorite Song without iTunes

When it comes to customizing ringtones for iPhones, iMyFone TunesMate has proven to be the best option. Superb media management software that gives you room to make any song of your choice a custom ringtone for your iPhone. Flexible and easy to use, all you just need do is to select the song to begin.Also Read:jihosoft Free iPhone Data Recovery

Sponsor ads:

Gihosoft Free iPhone Data Recovery:https://www.gihosoft.com/iphone-data-recovery-free.html

Gihosoft iPhone Data Recovery Free

Free iPhone Data Recovery Software for Windows/Mac

Recover up to 12+ types of files, including contacts, SMS, photos, WhatsApp, Viber, notes, etc.

Restore lost data from iOS devices directly or from iTunes and iCloud backup

Recover iPhone data lost due to iOS upgrade/jailbreak, accidental deletion, device lost or broken

Support all the latest iPhone, iPad and iPod Touch

Both Free and Pro version.

If you lost data after you updated to a new iPhone, you can always use Gihosoft iPhone Data Recovery to get the data back from the old iPhone or backup.You may also like: iphonerecovery.com

If you use android phones, please choose Gihosoft Android Data Recovery.

With Gihosoft Android Data Recovery, no longer afraid of data loss!

Must read:Youtube video downloader for pc

Gihosoft RePicvid Free Photo Recovery Software provides a free photo recovery software for windows to help users recover the deleted or lost photo for free.

Jihosoft Android Data Recovery: the best Android Data Recovery software for Windows and Mac to recover deleted contacts, messages, photos, videos, WhatsApp and etc from Android devices.Tips:How to transfer messages from iPhone to iPhone

Tuesday, 26 February 2019

Apple Admits Intentionally Slowing down Older iPhones, Here’s What You Can Do about It

Apple Admits Intentionally Slowing down Older iPhones, Here’s What You Can Do about It
Why Apple Slows down Old iPhones?
1 Protect Devices with Older Batteries

According to Apple, they do this to protect the devices with relatively older batteries. They said that lithium ion batteries cannot handle the processing demands as expected when they age, it results in problems such as the device shutting down unexpectedly. So they release new update that causes the iPhone to slow down and reduce its performance in order to prevent those unexpected shutdowns.


So the reason to slowing down older iPhones is pretty clear. It is directly associated with the flagging battery. As the processor of an iPhone makes a big current draw from such a battery, the battery may deliver the current in spikes which is bad because it can damage the different components of the phone. As a precaution, iPhone unexpectedly shuts down to protect its processor from that damage.Also Read:Voice Changing Apps & Software for Skype
Sponsor ads:Fix SD Card Error on GoPro Hero

This unexpected shutdown issue became widespread in 2016, which forced the company to come up with an update that included a fix, causing the phone to slow down with somewhat old, low-charged, or cold battery, Apple said.

Other common reasons why old iPhones slow down include (but not limited to) the following:
2 OS Upgrades

New OS upgrades introduce new features and functionalities. And if your device has a relatively older hardware, then it makes sense that it doesn’t have enough resources to handle the extra overhead. As a result, the device feels a bit slower.
3 App Updates

Similar to OS upgrade, some apps also have the same effect on phone’s performance. Apps become bloated with newer updates and the added features require relatively more resources, causing them to eat up more CPU and RAM. Hence, the phone’s performance feels slower.

You can also refer to the following video to learn about why Apple slows down old iPhones:
Also Read:Set a Voice Recording as a Ringtone on iPhone Xs/X/8/7/6s


Also Read:Blogging Apps for iPhone and iPad to Start Your Blog

The oBike Global Data Breach and What This Means for You


Living in the Information Age, data security breaches seem to be an everyday occurrence. Some are worse than others, though. Recently, there was a data breach of the personal information of oBike users—a bike sharing service that spans several countries. Though luckily the app doesn’t store credit card details, users’ names, emails, and phone numbers were leaked onto the Internet.

Even more disturbing than that, Taiwanese security experts say that they knew about the leak since June, but that oBike paid little attention to it. This just goes to show that you can’t always leave your privacy in the hands of third-parties. Sometimes you have to take control of your own data to avoid these kinds of privacy issues.
Serious Data Breaches That Shook the World


The oBike breaches may have not been anything major, but they are far from the only security holes that have been exploited by hackers over the years. For example, KeyRaider—a type of malware for iPhone—store the login credentials of hundreds of thousands of iPhone users in 2015. Granted, this only affected jailbroken phones, but it was a huge security problem nontheless.

Having a phone that isn’t jailbroken doesn’t mean you’re protected, either, though. Also in 2015, Apple had to pull dozens of apps from their store after it was discovered that they contained malware—called XcodeGhost—that could harvest private data from a user’s phone.

Besides that, there have also been huge global data breaches that users have had little control over. Hackers gained access to every Ebay account back in 2014, and 2016 Yahoo revealed that all of its user accounts had been compromised over the course of a few years.

As you can see, sometimes there is nothing you can do because the data is stored on the servers of the particular service that you’re using (as in the case of Ebay and Yahoo)—however, sometimes you can take important precautions, especially if you keep a lot of your data off the cloud and on your device.
Should You Do Anything?

All right, so there are times that you can try to protect your data. Should you, though? Is the risk really that high, and is it really worth the effort? Well, in a word, yes!

No matter what kind of device you have, your private data is at risk of people harvested.

According to Axran Technologies (an app security company), 78% of iOS apps have been hacked. This is a huge number, and considering that many of the apps you use have access to your private data, it should really make you reconsider what you’re keeping on your phone.
How Do iOS Users Protect Themselves from Data Breaches?

How do you protect yourself from data breaches like these, though? First, it’s important to focus on the things you can control, rather than the things that you can’t. You have no control over whether iCloud, for example, experiences a huge security breach like it did in 2014, but you can avoid putting private photos on iCloud in the first place, and you can make sure that any private correspondence, photos, or other media are scrubbed clean from your phone when you delete them.Also Read:12 Best Painting & Drawing Apps for iPad and iPad Pro in 2019

Consider adopting these habits when it comes to data on your phone:


Don’t take compromising photos of yourself with any Internet-connected device, even if you plan on deleting them later. There is always the chance that they can be leaked.


Don’t use third-party apps to have extremely private conversations. If you are concerned that what you’re discussing could ever be leaked, then use more secure communication methods.


Avoid using unauthorized apps on your phone. Most iPhone malware attacks happen on jailbroken phones.


Don’t store financial information on your device, including credit card details and unencrypted cryptocurrency wallets.


Sponsor ads:


Gihosoft Free iPhone Data Recovery:https://www.gihosoft.com/iphone-data-recovery-free.html


Gihosoft iPhone Data Recovery Free


Free iPhone Data Recovery Software for Windows/Mac


Recover up to 12+ types of files, including contacts, SMS, photos, WhatsApp, Viber, notes, etc.


Restore lost data from iOS devices directly or from iTunes and iCloud backup


Recover iPhone data lost due to iOS upgrade/jailbreak, accidental deletion, device lost or broken


Support all the latest iPhone, iPad and iPod Touch


Both Free and Pro version.


If you lost data after you updated to a new iPhone, you can always use Gihosoft iPhone Data Recovery to get the data back from the old iPhone or backup.You may also like: iphonerecovery.com


If you use android phones, please choose Gihosoft Android Data Recovery.


With Gihosoft Android Data Recovery, no longer afraid of data loss!


Must read:Youtube video downloader for pc


Gihosoft RePicvid Free Photo Recovery Software provides a free photo recovery software for windows to help users recover the deleted or lost photo for free.


Jihosoft Android Data Recovery: the best Android Data Recovery software for Windows and Mac to recover deleted contacts, messages, photos, videos, WhatsApp and etc from Android devices.Tips:How to transfer messages from iPhone to iPhone


jihosoft Free iPhone Data Recovery

Monday, 25 February 2019

7 Tips to Fix iPhone Says No Service after Updating to iOS 12


7 Tips to Fix iPhone Says No Service after Updating to iOS 12
1. Make Sure Your SIM Card & Card Slot Are Fine

No need to get worried when the problem can easily be fixed by some sort of examination of your iPhone. These are the three things you need to do firstly to fix no service on iPhone.


First of all, remove your SIM card and check the iPhone with another one. If another SIM card is working on your device, the problem might be with your SIM card. Therefore, contact with your carrier and ask them for SIM replacement.


Secondly, try checking your SIM card in another iPhone or other device. When the SIM card is successful in finding signal in another device, then maybe there are some problem with the hardware or software of your device.


Lastly, please make sure that the SIM slot is not loose. Check the SIM card slot and if it is loose, the no service issue will surely be the result of this.
2. Hard Reset iPhone

We have given hard reseting as one of the solutions in different articles with different problems. This is one of the basic troubleshooting steps that can help you out getting rid of the problem. To perform this, you have to press and hold the "Home" ( "Volume Down" button on iPhone 7 and later version) and "Sleep/Wake" buttons at the same time. Hold the buttons this way until the Apple logo emerges. Release the buttons once the logo comes and check if the problem continues. If yes, move further to the next fix.


3. Turn On and Turn Off Airplane Mode

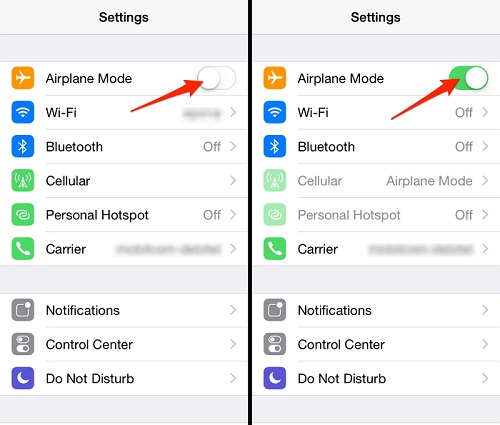
Another helpful way is enabling and disabling the Airplane mode to fix no service on iPhone. Simply go to "Settings" > "General" > "Airplane Mode". Toggle it on and after a few seconds, turn it off.

Alternatively, move to control center by swiping up from the bottom of screen. Turn on Airplane mode by taping on its icon. And disable it after a few seconds.


4. Reset Network Settings

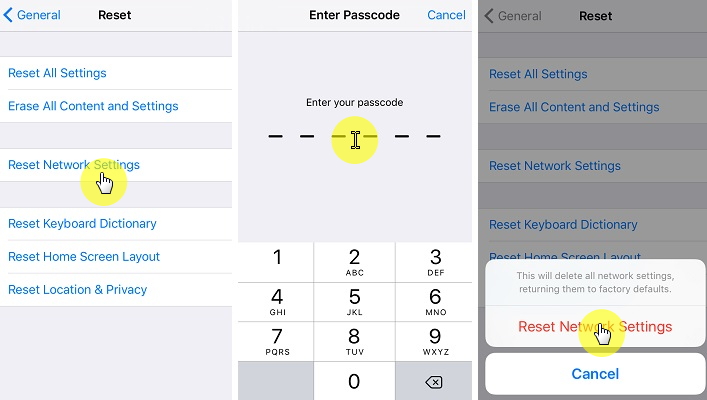
Another effective fix to perform when iPhone says no service is resetting network settings. This will assist in solving Wi-Fi or network issues. Also, this method will result in deleting all your saved Wi-Fi networks. So, after performing this, you will need to re-enter the information. Go to "Settings" > "General" > "Reset" > "Reset Network Settings" > Type in your passcode and tap on "Reset Network Settings" again.Sponsor ads:Setup Dual Monitors in Windows 10 Computer 2019
Sponsor ads:Recover Deleted Video and Audio Files from Android Phone


Sponsor ads:Free File Recovery Software 2019 for Windows and Mac


5. Reset All Settings

You can try this method when unfortunately the above solutions didn’t favor you. For this just move to "Settings" > "General" > "Reset" > "Reset All Settings" > Enter the passcode if asked the hit "Reset All Settings" to confirm. Probably the no service on iPhone will be vanished by this method.


6. Fix iPhone Says No Service without Data Loss

The problem isn’t fixed yet? Maybe software malfunction is triggering the issue. In this case, iMyFone iOS System Recovery will give you a hand. Also, if you don’t want to lose your data at all, this method is going to really help you.

Transferring Files from PC to iPhone iOS 12/11 without iTunes 2019


1. Transfer Files from PC to iPhone iOS 12/11 Using Email


Using e-mail is an old method, but it still works. The basic idea is this:


Step 1. Open up your browser and go to your e-mail account.


Step 2. Compose a new e-mail and make yourself the recipient.


Step 3. Upload the file you want to transfer as an attachment, then send the e-mail.


Step 4. Go on your iPhone, sign into your e-mail account and download the attachment.


As you can see, it’s simple, but there are a few limitations.


For one, most web e-mail services put a limit on how big the files are or how many you can transfer.


In addition, if the file is not supported by your iPhone, your e-mail service will not convert the file automatically like TunesMate.


When you need to open the file, you need to go to the e-mail again. The downloaded files won’t be added into the specific built-in apps on iPhone.
3. Copy Files from PC to iPhone iOS 12/11 without iTunes but Dropbox


Dropbox is a useful cloud service. To transfer your files using Dropbox, try this:


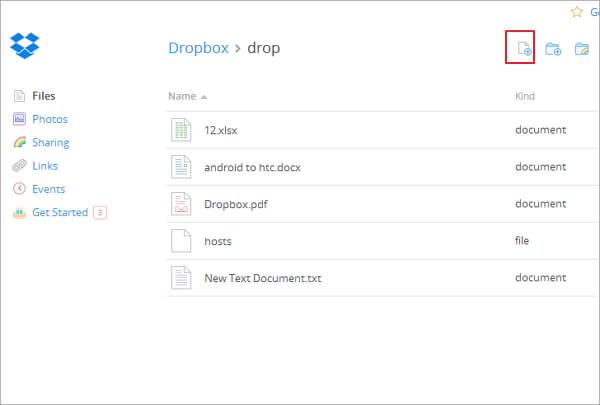
Step 1. Sign into Dropbox from your browser. Upload the file that you want to transfer.


Step 2. Install the Dropbox app to your iPhone if you haven’t already. Sign in.


Step 3. Download the file to your iPhone from Dropbox.


This method is similar to the e-mail method, except of course you can transfer more files, and Dropbox will also tolerate files of a larger size.


Limits


Some of the downsides however are that you have to have an Internet connection to do this (as with e-mail), and there are limits to the amount of files that you can upload to Dropbox without paying.


It’s also requires several steps (uploading, installing app and then downloading), instead of the easy one-step method.


The downloaded files won’t be added info the specific apps on iPhone. You need to go through Dropbox to access the files.
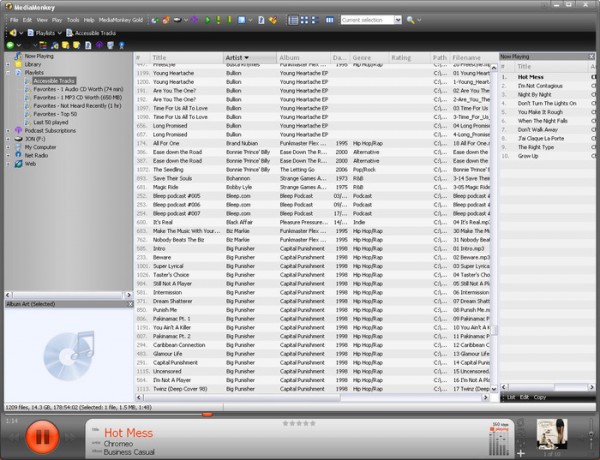
4. Transfer Files from PC to iPhone iOS 12/11 Using Mediamonkey


You can also use a tool like mediamonkey to transfer files. Here’s how:


Step 1. Download MediaMonkey, then install it on your PC.


Step 2. Open MediaMonkey. Go to File > Add/Rescan Tracks to the Library


Step 3. Browse for the files that you want to transfer when the file browser window comes up.


Step 4. When you’re in the folder where the files are, click OK, and now the contents of the folder should be in the program library.


Step 5. Connect your iPhone to your computer.


Step 6. In the MediaMonkey application, an icon for your device should come up. Click it.


Step 7. MediaMonkey should start transferring the files. It will tell you when it’s done.


There are also some limitations to MediaMonkey, though.


For one, you can’t really choose individual files to transfer like you can with TunesMate.


Also, it won’t automatically convert files to an iOS-compatible format, so you’ll have to choose only files that work with iPhone.


It can’t work for Mac.Sponsor ads:Setup Dual Monitors in Windows 10 Computer 2019

Sponsor ads:Recover Deleted Video and Audio Files from Android Phone
Sponsor ads:Free File Recovery Software 2019 for Windows and Mac

Thursday, 21 February 2019

Restore your iTunes library if iTunes Library Disappeared 2019


Restore your iTunes library if iTunes Library Disappeared

As stated above, iTunes library can crash or miss after an update, but that should not be the end of the matter. You can restore it by following the steps below.

Step 1: First, exit iTunes if you have it opened.

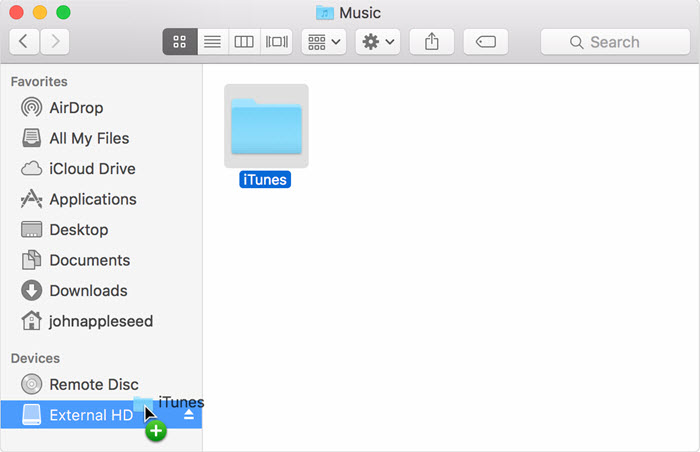
Step 2: Go to your computer and find external drive.


Step 3: Backup iTunes folder to the external drive.

By default, your iTunes Media folder is in your iTunes folder:

• Mac: Finder > username > Music Gihosoft Free iPhone Data Recovery:iphonerecovery.com

• Windows Vista or later: \Users\username\Music\

• Windows XP: \Documents and Settings\username\My Documents\My Music\

Step 4: Now, drag the previously backup iTunes folder from the external drive to a specific location on the internal drive.

Step 5: After this, return iTunes folder back into its previous location.

Step 6: If you use Windows, press down the Shift Key or Option key (if you use Mac) while opening iTunes.

Step 7: "Choose iTunes Library" message will appear. Click Choose Library.


Step 8: Select the iTunes folder that you dragged in step 4 from the internal drive.

Step 9: Click open (Windows) or Choose (Mac).

Step 10: Finally, select the iTunes Library.itl file inside.

That is it. These steps will help you to restore your crashed or missing iTunes library quickly. However, you may want to use a less complicated and reliable way of restoring iTunes library. What you need to do here is to use a third-party tool.Sponsor ads:

Gihosoft Free iPhone Data Recovery:iphonerecovery.com

Free iPhone Data Recovery Software for Windows/Mac

Recover up to 12+ types of files, including contacts, SMS, photos, WhatsApp, Viber, notes, etc.

Restore lost data from iOS devices directly or from iTunes and iCloud backup

Recover iPhone data lost due to iOS upgrade/jailbreak, accidental deletion, device lost or broken

Support all the latest iPhone, iPad and iPod Touch

Both Free and Pro version.

If you lost data after you updated to a new iPhone, you can always use Gihosoft iPhone Data Recovery to get the data back from the old iPhone or backup.

Top 10 Best FRP Bypass Tools to Bypass Google Account on Android Device 2019

Worth reading:download youtube 1080p

If you use android phones, please choose Gihosoft Android Data Recovery

Jihosoft Android Data Recovery: the best Android Data Recovery software for Windows and Mac to recover deleted contacts, messages, photos, videos, WhatsApp and etc from Android

How to Fix iPadOS Password Not Recognised Error

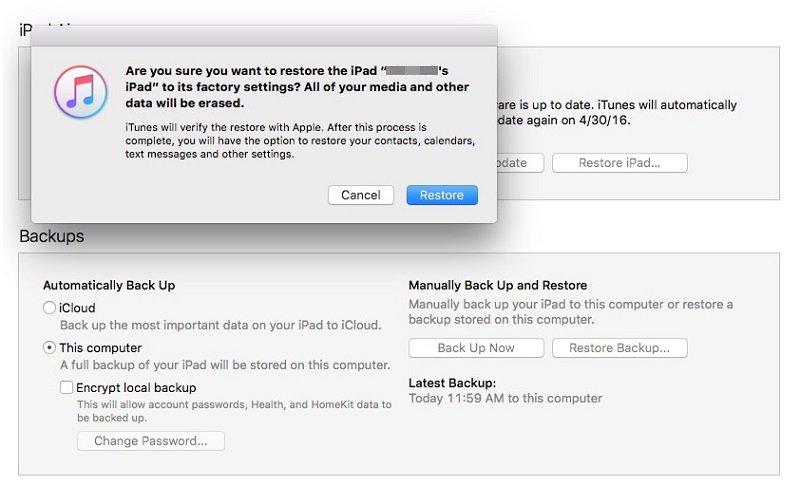
Restore iPad using iTunes to Bring Your iPad to Normal (Device Must Be Sync with iTunes Before) Although, the previous procedure is effectiv...