Friday, 9 November 2018

How To Recover Deleted Notifications On Your Android Phones 2019 New Guide


Learn how to recover deleted notifications on your Android phone: As we all know, Android’s notification shutter is awesome, as it gives a simple overview of everything arrived just now on your Smartphone. So today we are going to share the best method to get back your accidentally swiped notifications from your Android smartphone. Go through the post, to know about it.

Today billions of users are using Android devices, as it is the only platform that offers lots of features for their users. In Android when you get any notification it gets listed on the notification panel, and when we clear it, it permanently goes. However, sometimes we remove some of the relevant notifications that we might not want to delete. Therefore, we are here with the trick for How to Recover Deleted Notifications on your Android Phone. Yes, it is possible, you can recover notifications in your Android device by just following some of the simple steps that we have discussed in below method.

Also Read: How to Recover Deleted Files from Android

How to Recover Deleted Notifications on your Android Phone

The method is very simple and straight and it doesn’t require any tool or app, you just need simple settings shortcut that you will fix in your home screen which in turn will display all the previous notifications of the day. Just follow the below steps to proceed.

Also Read: Top 5 Causes of Android Data Loss and How to Prevent It

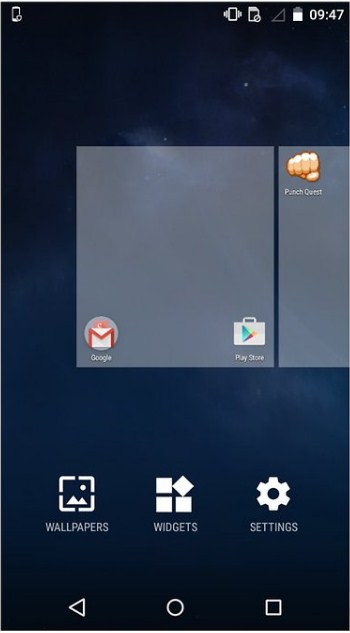
Step 1. First of all, long-press on a home screen of your Android device.
How to Recover Deleted Notifications on your Android Phone

Step 2. Now select widget option there and then swipe to left until you find “Settings” widgets. Tap on it and drop it on your home screen.

Step 3. Now option will appear to set the shortcut of any of settings, scroll down and select “notification log” there.


Extra Tips – Recover Lost Data from Android

Have you lost more than notifications? Files, messages, pictures … etc.

I recommend you to use Gihosoft Free Android Data Recovery Software that will help you recover all your data with a click of a button. It’s free to use and it’s the best of its kind. Enjoy recovering deleted files from Android by clicking the button below right now!

WindowsFree DownloadWin Version MacFree DownloadMac Version


How to Recover Deleted Notifications on your Android Phone

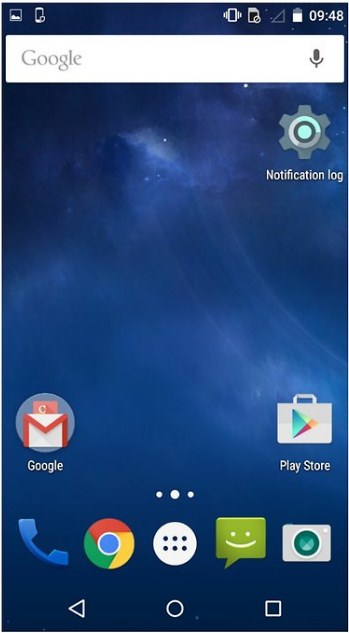
Step 4. Now the notification log will get set there on your home screen.
How to Recover Deleted Notifications on your Android Phone

Step 5. Now you can see all the notifications that you had already cleared.

How to Recover Deleted Notifications on your Android Phone


Also Read: How to Add a Windows-Like Recycle Bin to Your Android Phone

Notification log is not available on every Android version it is only available on Android 4.3 Jellybean or above. So, some of the users might not find Notification log in settings.
#Using Timeline-Notifications history

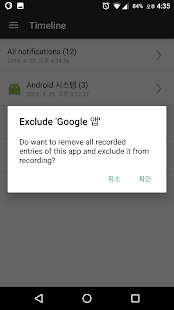
With this app, you can always see the history of notifications when you want. You can see which app had generated the notification and when it had been generated. Thus, you can easily recognize your past activities.

Step 1. You need to download and install Timeline-Notification history on your Android device.


DownloadQR-Code

Timeline - Record and check all notifications.

Developer: codococo

Price: Free+
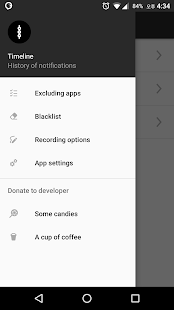


Step 2. Now you need to grant Notification access rights for that simply tap on “OK” to continue

Timeline-Notifications history

Step 3. Now you need to enable “Timeline” on Notification access

Timeline-Notifications history

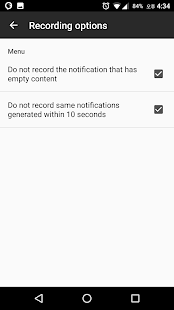
Step 4. Now open the recording option from the app and then enable the first two options.
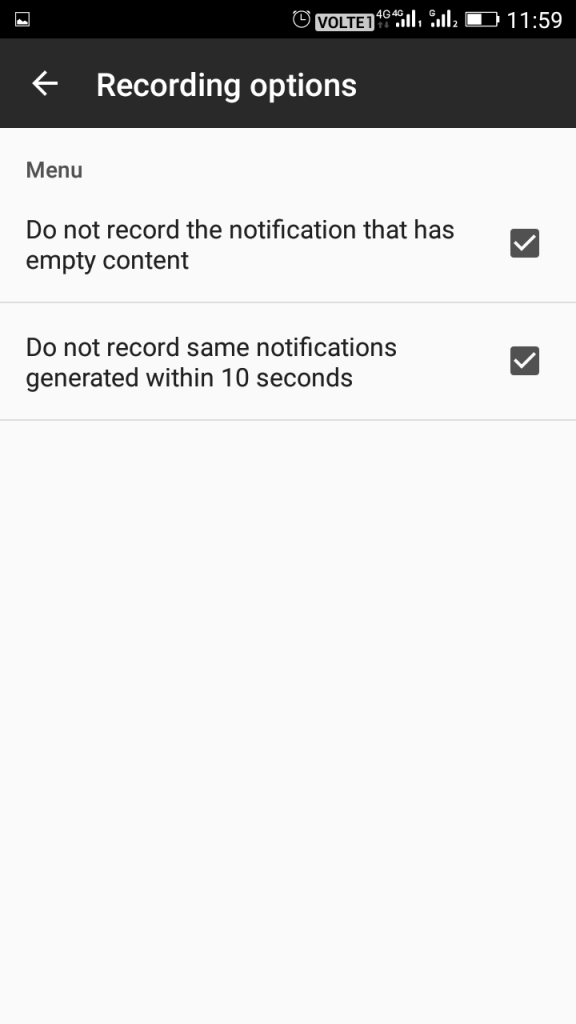
Timeline-Notifications history

Step 5. Now each and every notification you will receive on your device will be shown on timeline app.

Timeline-Notifications history

It is the easiest way to record notification, this will help you to read all the notification that you have missed.

Also Read: How to Recover Deleted WhatsApp Messages on Android
#Using Recent Notification

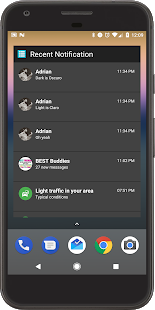
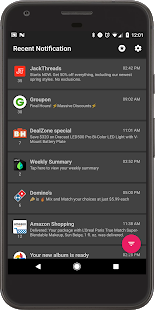
Have you ever missed an important notification shown in your device status bar? No worries! Recent Notification can safely store them for you. Relax and read them when you find time.

Step 1. First of all, download and install Recent Notification on your Android smartphone.


DownloadQR-Code

Recent Notification

Developer: LibApps

Price: Free+


Step 2. Now you will see the screen like below. Here you need to enable the Notification access. Simply, tap on Enable now to continue.

Using Recent Notification

Step 3. Now you will see the screen like below. Here you need to tap on the Setting button which is located on the top right side corner.

Using Recent Notification

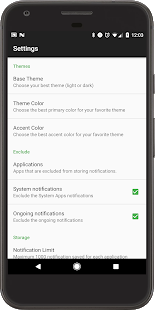
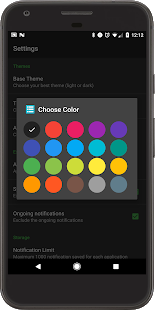
Step 4. Now you can alter any settings as per your wish. You can change the base theme, theme color and can even include & exclude apps.

Using Recent Notification

That’s it! You are done. Now, whenever your phone receives any notifications it will be saved on the Recent Notification app.

Using Recent Notification
#Using Notification History

Notification History is an Android app that records all the notifications of SMS, popped dialog, app installation and much more. This is one of the handy Android apps which you can use to read the deleted notifications.

Step 1. First of all, download and install Notification History app on your Android smartphone



DownloadQR-Code

Benachrichtigungsverlauf

Developer: Yotta Studio

Price: Free


Step 2. Launch the app, and you will see the screen like below. Here you need to enable the Accessibility Service and Notification Access.

Using Notification History

Step 3. Now open the settings panel of the app and set everything as per your wish.

Using Notification History

Step 4. Now move back to the main screen of the app and you will see all your notification history over there.

Using Notification History

That’s it, you are done! This is how you can use Notification history to recover/read deleted notifications.
Using Unnotification (Android Oreo)

Well, Unnotification is an Android app that works only with Android 8.0 Oreo operating system. So, if your devices are running Android Oreo, you can use the app to bring back deleted notification. Here’s how you can use Unnotification to bring back deleted notification.

Step 1. First of all, download & install Unnotification on your Android smartphone. You can get the download link from here.

Step 2. Now launch the app and grant the Notification access.

Image Source: howtogeek

Step 3. Now you will get a confirmation messages for allowing notification access. Simply, tap on ‘Allow’ to continue.
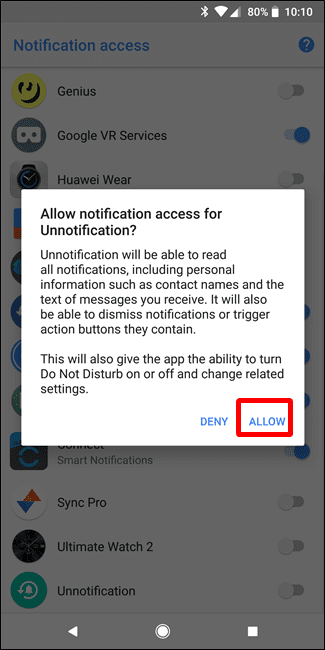
Image Source: howtogeek

Step 4. Once done, you will no see an Unnotification icon in the status bar. Now, whenever you will get a new notification, the app will ask you whether to undo that dismissal or not.

Step 5. The app will automatically get rid of the notification after 5 seconds. But, you can still access your notification by going through the app.

Step 6. Another interesting thing about Unnotification is that it allows users to blacklist apps that you don’t want unnotification to work with. However, if you blacklist any app, Unnotification will not save any further notification from the blocked app.

Image Source: howtogeek

That’s it, you are done! This is how you can use Unnotification to recover deleted Notifications on your Android.

So above is all about How to Recover Deleted Notifications on your Android Phone. By this method, you can now recheck any important notification that you have already cleared on your Android device. Hope you liked the article. Don’t forget to share it with your friends and leave a comment below if you need help at any step.

Thursday, 8 November 2018

How to Unlock iPhone without Passcode without Restore 2019


How to Unlock iPhone without Passcode without Restore

You can use this method of how to unlock iPhone without passcode without restore if you had synced your iPhone with iTunes.

Step 1: Using a USB cable connect your iPhone to the PC or Mac that you synced your device with.

Step 2: Launch iTunes. If it asks for a passcode, try another computer you’ve synced with.

Step 3: Let iTunes sync your device and make a backup.

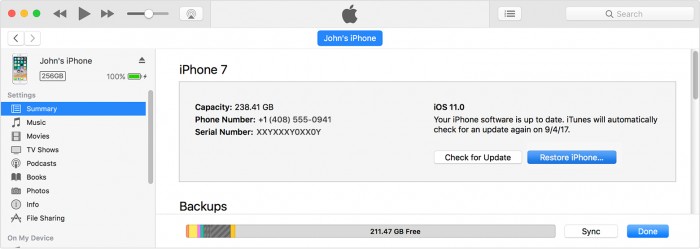
Step 4: Once the process is finished click Restore iPhone.


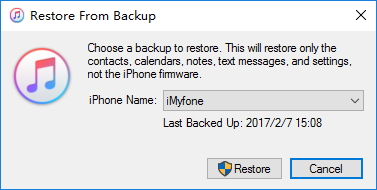
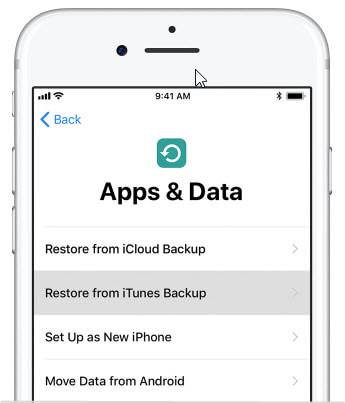
Step 5: When it finishes, you need to set up your iPhone again. When you reach the Set Up screen, click on Restore from iTunes backup.


Step 6: Select your device on iTunes and then select the recent backup to restore.If you lost data after you updated to a new iPhone, you can always use Gihosoft iPhone Data Recovery to get the data back from the old iPhone or backup.


Requirements of This Method to Work:


The iTunes you use must be the one you synced your iPhone with before. If any passcode is asked during the process, you should change to another synced iTunes, or this way is not available for you.


If your iPhone is running on iOS 11.4.1 or later, the USB Accessories which you can find in “Settings > Face ID & Passcode or Touch ID & Passcode” must be turned on. Or your iTunes cannot detect your iPhone.

At the very least, if this way is not available for you, you can still save your locked iPhone without passcode by the following ways.

Monday, 29 October 2018

How to Take 360-Degree Photos on Android 2019


Two-dimensional photos have surely become an old trend now. As the latest trend is the 360-degree photo shot which lets you take images in any direction from a single standing position. But if you are still scratching your head wondering what is 360-degree shots? Then it is a series of photographs that get stitch together and let you capture your surrounding in every direction possible. Be it left, right, upside, downside, just anywhere! And the best part you don’t have to move accordingly as you can take shots from a standing position too. Also, 360-degree photos are sure in news right now, as you might have seen them on Facebook, Google Maps or on YouTube videos and they look quite interactive and interesting.

Worth Reading: How to Recover Deleted Photos from Android Phones

So, if you are an aspiring photographer or a beginner who wants to take 360-degree photos but don’t own a 360-degree camera. Then, don’t lose hope, as you can still take beautiful 360-degree shots with your Android smartphone too. How? By just following the steps mentioned below.


How to take 360-degree photos on Android:


Open and install Google Street View app.


Now go to the spot where you want to take your interesting 360-degree photos. Then tap on Create from the bottom right corner.


Next, you will see an orange dot and a circle on your screen. Now you have to move your smartphone around and guide the circle over the orange dots until an image has been captured.


Do this same process until 20 or so odd times, till your whole surrounding has been photographed. Now, once you have a good series of photos tap the “tick mark” from the bottom of your screen.


Now your 360-degree photos will get stitched together and you can save it in the “Private” tab on your phone. The photo is also saved in your phone. (unless you turned this setting off).


Note: Images are snapped automatically when you properly guide the circle over the orange dot. So, you don’t need to press any shutter button.

So, now with the above steps, you know how to take 360-degree photos on your Android smartphone with so much ease. Although the above steps are for the Google Street View apps, there are also a number of other 360-degree camera apps which will serve you the purpose.

Tips:

Restoring Lost Photos and Videos from iPhone

If you have deleted some of your pictures or videos from your gallery, then there is a straightforward way to Recover Deleted Files iPhone back.
After you delete the media files from your gallery, be it photos or videos, then you must know that iOS has a feature that the deleted media files doesn’t get deleted immediately, but it gets compiled to a temporary folder from where it gets deleted after 30 days. If you lost data after you updated to a new iPhone, you can always use Gihosoft iPhone Data Recovery to get the data back from the old iPhone or backup. Should you wish to recover these files, you must go to that “recently deleted” folder and retrieve these files before 30 days.
If you use android phones, please choose Gihosoft Android Data Recovery.

Related Posts:

Photo Scratch Remover: Make Old Photos Look New Again

How to Remove Text and Words from Photos

Smartphone Photography Tricks: How to Take Better Pictures with a Phone

The Best Photo Eraser Apps for Android

The Top Best Photo Gallery for Android

How to Make Video to Gif on Android


So, if you find this article helpful or interesting don’t forget to share it on social media. And do mention your views in the comment box.


Jihosoft Photo Eraser

Erase unwanted objects and perfect your amazing photos!

Remove objects from photos with Photo Eraser is almost as easy as taking a shot. Now you can use this tool to erase undesirable objects from your pictures, such as tourists, watermarks, logos, texts, blemishes and other unwanted things without real photo-editing skills required at all.


Jihosoft Android Data Recovery

The most powerful and professional data recovery software for Android that can restore deleted or lost contacts, photos, videos, audios, SMS, call logs, WhatsApp chat, Viber messages from any Android devices due to accidental deletion, virus attack, formatting. It supports all popular Android smartphones and tablets like Samsung, HTC, LG, Huawei, Motorola, Nexus, etc. In the meantime, you will be guided step by step if you never used this kind of tool before.

Sunday, 7 October 2018

How to Download Podcasts without iTunes 2019


How to Download Podcasts without iTunes

Of course you can download podcasts from other source, here are three popular podcast websites.
1 Nerdist Podcast

It is the official website of the iTunes podcasts outside the program. Therefore, this site is viral among the iPhone and users. This site offers the same episodes as the iTunes podcast station so that the users don't have to worry about missing the events they want. The following guide shows you how to download podcasts from Nerdiest Podcast.


Save Podcasts from Nerdiest Podcast:

Step 1: Visit the site with the URL http://nerdist.com/podcasts/nerdist-podcast-channel/.

Step 2: Select the episode of the podcast you need.

Step 3: Click the Play button at the bottom to start listening to the podcast.

Step 4: You'll see the Download option at the right side of the page. Click the Download button to start downloading the episode to your computer.

Step 5: You can also right-click and select save link as to download the podcast.
2 Podbay.fm

It is another site that allows the users to download podcasts without iTunes. The site offers an extensive library which enables you to enjoy all kinds of podcasts. This site will allow you to download the podcasts to MP3 audio files on your computer, and then you'll be able to transfer the podcasts to your mobile devices for enjoyment on the go. The guide below will show you how to download podcasts from Podbay.fm.


Step 1: Visit the website at the URL http://podbay.fm/.

Step 2: The user can browse the categories to find the kind of podcasts they are interested in.

Step 3: After selecting the file category, you'll see the related topics in the web page.

Step 4: Choose one topic and click the Listen button.

Step 5: You'll get to another page to enjoy the podcast.

Step 6: If you want to download the podcast, you can click the Download button to save it to your computer.
3 Digg Reader

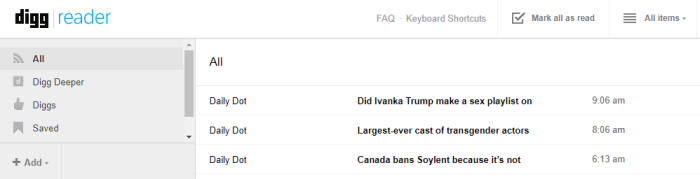
The Digg Reader is one of the best reader sites. To download podcasts with Digg Reader when you have a url of the podcast.


Step 1: Visit http://digg.com/reader/ to start the process.

Step 2: Click the Sign-Up button, and you can also choose to log in with your SNS account.

Step 3: Click the Add button at the left bottom to add the podcasts.

Step 4: Paste the URL of the podcasts in the blank, and Digg Reader will analyze the URL.

Step 5: The user can also subscribe to the RSS feed on the main site page.

So that's how you can download podcasts without iTunes, and the sites will help you to get the podcasts on your computer quickly. However, you may have found out that you'll have to use iTunes to sync the podcasts to your iPhone or iPad. If you don't want to use iTunes to transfer podcasts to your devices, you'll need the help of the third-party iPhone file manager.Gihosoft Photo Eraser Erase unwanted objects and perfect your amazing photos!

If you lost data after you updated to a new iPhone, you can always use Gihosoft iPhone Data Recovery to get the data back from the old iPhone or backup.

Jihosoft Photo Eraser

Free iTunes/iPhone Backup Extractor for iPhone, iPad

iPhone Backup Extractor - Extract Data from iPhone Backup

You may also like:online youtube downloader

Wednesday, 3 October 2018

Will Apps Transfer to a New iPhone?


It is understandable to wonder whether your Apps will be transferred to your new iPhone. Apps are after all a very important part of the device and you wouldn't want to have to go through the process of downloading your favorite apps all over again and losing all the data on these apps. You should know though, that if your old device is an iOS device, then your apps can absolutely be transferred to the new iPhone. In this article, we are going to share with you the various ways you can transfer apps from an old iPhone to your new iPhone.
1. Transfer Apps to a New iPhone Using iTunes

One of the best ways to get data from one device to another is via iTunes. You begin by creating a backup of the old device in iTunes and then restoring the backup to the new device. The process is easy and quite reliable. The following is a step by step guide to help you transfer data to anew iPhone using iTunes.

Step 1: Ensure that you are running the latest version of iTunes. If not take a moment to update the software. Also, ensure that you have a most recent backup of all the data on the old iPhone. If you don't, connect the old device to the computer and perform a backup of all the data. An encrypted backup will ensure that most, if not all of your password information will be transferred to the new iPhone.

Step 2: Once you have a recent backup of the old device, turn on the new device. On the "Hello Screen" follow the instructions to setup the device.

Step 3: Once you get to the "Apps & Data" screen, choose "Restore from iTunes Backup" and then tap "Next" to continue.


Step 4: Connect the new iPhone to the computer and open iTunes. Select the device when it appears within iTunes.

Step 5: Select "Restore Backup" and then choose the most recent backup you created. Enter the password if the backup you are restoring from is an encrypted backup.Gihosoft Photo Eraser Erase unwanted objects and perfect your amazing photos!

If you lost data after you updated to a new iPhone, you can always use Gihosoft iPhone Data Recovery to get the data back from the old iPhone or backup.

Jihosoft Photo Eraser

Free iTunes/iPhone Backup Extractor for iPhone, iPad

iPhone Backup Extractor - Extract Data from iPhone Backup

Jihosoft Android Data Recovery: the best Android Data Recovery software for Windows and Mac to recover deleted contacts, messages, photos, videos, WhatsApp and etc from Android devices.

Gihosoft Android data recovery Free is a super awesome software specialized in Android file recovery. With this program, you are able to recover deleted photos, music, videos, messages, contacts, call logs, WhatsApp messages, Viber chat history and more from Samsung, Huawei, LG, HTC, Motorola, Google, Oneplus, Sony, Lenovo, ZTE and other Android devices directly.

You may also like:online youtube downloader


Step 6: Wait for the restore process to be completed and then follow the rest of the set-up instructions to complete setting up the iPhone. Keep the device connected to a Wi-Fi network to download content in your iCloud account including apps, music and photos.
2. Transfer Apps to Your New iPhone Using Quick Start

You can use an iPhone or iPad that is running iOS 11 to automatically set-up a new device. The process requires you use both devices and can be done in these simple steps.

Step 1: Turn on the new iPhone and place it next to your current device. The Quick Start screen should appear on your current device offering you the option to set-up the new device using your Apple ID. Make sure the Apple ID displayed is the one you want to use and then tap "Continue."


Step 2: When an Animation appears on the new device, hold the current device over the new one and center the animation on the viewfinder.

Step 3: Wait for a message that says Finish on New iPhone and if you can't use the current device's camera, choose "Authenticate manually" and follow the steps.

Step 4: Enter the current device's passcode on the new device and follow the instructions to set up Touch ID or Face ID on your new device.

Step 5: Enter the Apple ID password on the new device and then restore the apps, data and settings from a most recent iCloud backup.

Step 6: Keep both devices close as everything including settings and passwords are transferred. Connecting the new device to a power source and a Wi-Fi network will automatically download all your music, apps and photos.


How to Fix iPadOS Password Not Recognised Error

Restore iPad using iTunes to Bring Your iPad to Normal (Device Must Be Sync with iTunes Before) Although, the previous procedure is effectiv...